

This is the fourth post in the GitLab CI/CD Series, where we'll be setting up a build & deploy pipeline using GitLab CI/CD. In the previous posts, we focused on creating deployable artifacts from Angular and .NET applications.
GitLab CI/CD Series Table of Contents
- Building Angular application
- Building .NET API Application and EF Core Migration Bundle
- Deploying Angular application to Azure Storage
- Deploying .NET API to Azure App Service and Applying EF Core Migrations (you are here right now)
If you've never worked with GitLab CI/CD before, the first post is a great thing to have a look through, as it covers most of the basics.
Recap & summary
Here are the assumptions about the project:
- The project is hosted on GitLab
- One repository contains both .NET and Angular applications
- The Docker GitLab Runner executor will be used
- The CI/CD pipeline will consist of the following stages:
build,staging, andproduction, with the last two being all about deployment to different environments - The project structure is:
And this the the current look of the gitlab-ci.yml file:
To sum up: the build jobs are created when there are any changes in the client/ or server/ directories. The dependencies of each build are downloaded from the caching service before each build is started and are uploaded back to it once the build succeeds. The build-frontend job produces an artifact with the Angular application. The build-backend job's artifact contains the deployable .NET application and an EF Core Migration Bundle that is capable of applying database schema and data updates. Then the Angular application is deployed to Azure Storage.
Deploying .NET Application to Azure App Service using GitLab CI/CD
The constructed pipeline can build the backend and the frontend applications and deploy the frontend one to the world. Now it's time for the last piece of the puzzle - deploying the .NET application.
In the previous post, it was mentioned that there are multiple possibilities for deploying the frontend application. With the backend one, it's much simpler. On Azure, the Azure App Service is the most sensible option. It can even handle running an application in a Docker container.
Some time ago, there was a post on this blog on deploying a .NET application to Azure App Service using Azure CLI. You can find it here:

This is the method that the deploy-backend job will use. As with the deploy-frontend job, the mcr.microsoft.com/azure-cli Docker image will be used. Without any further ado, here's the job definition:
deploy-backend:
  image: mcr.microsoft.com/azure-cli
  rules:
    - changes:
      - 'server/**/*'
  dependencies:
    - build-backend
  before_script:
    - 'pushd ./tmp/build-artifact'
    - 'zip -r ../../publish.zip .'
    - 'popd'
    - 'az login --service-principal -u ${AZURE_SP_ID} -p ${AZURE_SP_SECRET} --tenant ${AZURE_TENANT}'
  script:
    - 'az webapp deploy --clean true --resource-group ${AZURE_RG} --name ${AZURE_APPSERVICE} --src-path publish.zip --type zip'
The steps are pretty much self-explanatory. There are two more variables that need to be added using the GitLab UI:
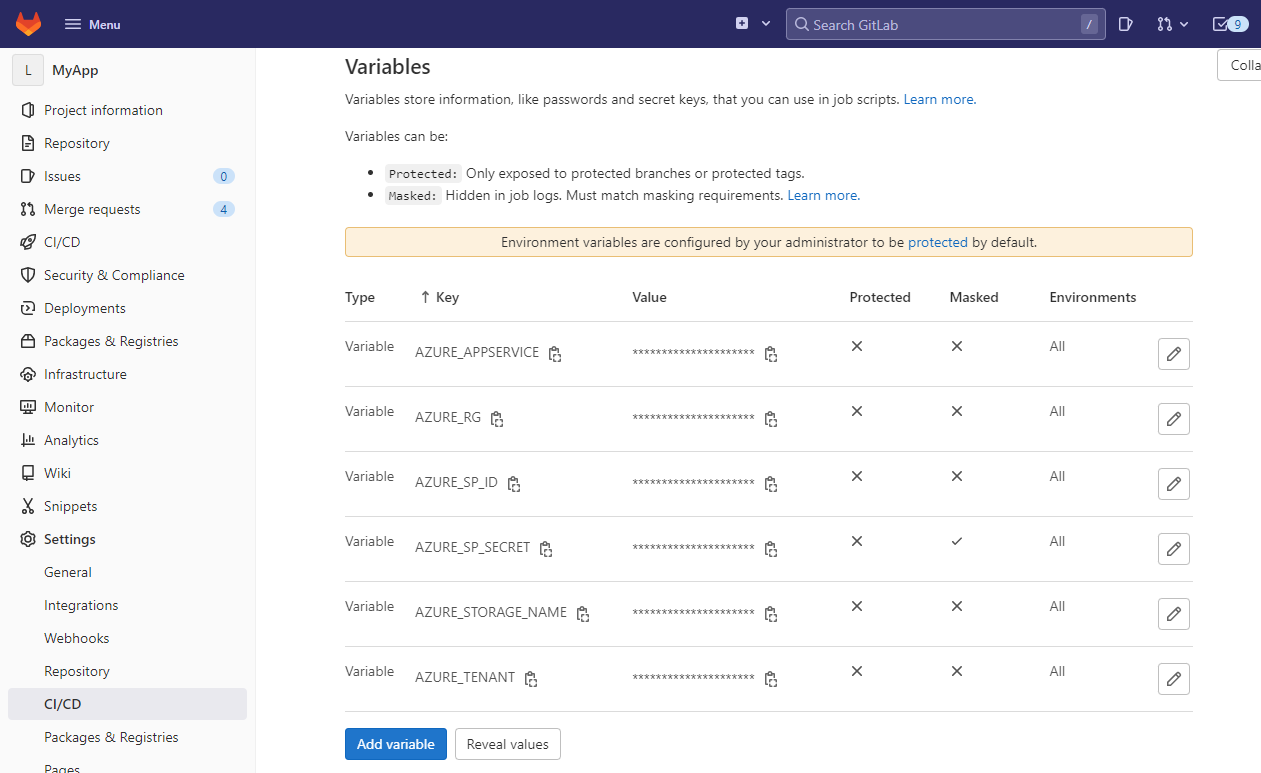
AZURE_APPSERVICE- the name of the Azure App Service that the application should be deployed toAZURE_RG- the name of the Azure Resource Group containing the Azure App Service
As before, these can be set in the Settings tab under CI/CD menu:
Side note: It was a surprise to learn that the artifacts always preserve the directory structure from which they are extracted and there is no way to discard the unnecessary directory hierarchy. It seems I was not the only one who found that annoying.
Applying migrations using EFCore Migrations Bundle
Now the more tricky part - executing the Migrations Bundle built earlier. Unfortunately, it is not as simple as executing it. There are a few things that need to be done first.
The migrations bundle needs to be provided with a connection string where the migrations should be applied. It could be stored in a masked variable like AZURE_SP_SECRET, but it can also be retrieved using Azure CLI. This will allow you to flex your CLI skills. The command looks like this:
az sql db show-connection-string -s <serverName> -n <databaseName> -c <client>Its output looks like this:
"Server=tcp:mydbserver.database.windows.net,1433;Database=mydbname;User ID=<username>;Password=<password>;Encrypt=true;Connection Timeout=30;"It's not perfect, but there's nothing that can't be fixed. First, the " characters must be trimmed:
DB_STRING=`az sql db show-connection-string --client ado.net --server ${AZURE_DB_SERVER} --name ${AZURE_DB_NAME}`
DB_STRING=`echo ${DB_STRING:1:-1}`
Once that's done, let's fill the username and password blanks using values stored in variables:
DB_STRING=`echo ${DB_STRING} | sed "s/<username>/${AZURE_DB_USER}/"`
DB_STRING=`echo ${DB_STRING} | sed "s/<password>/${AZURE_DB_PASSWORD}/"`
Now the connection string can be passed to the Migrations Bundle:
./tmp/migrations-artifact/efbundle --connection "${DB_STRING}"Remember to add the following variables: AZURE_DB_SERVER, AZURE_DB_NAME, AZURE_DB_USER, and AZURE_DB_PASSWORD.
Depending on the database server setup and your package versions, and many other things, this might fail in several ways.
Potential issues
Issue #1
Error loading shared library ld-linux-x86-64.so.2: No such file or directory (needed by ./tmp/migrations-artifact/efbundle)
Error relocating ./tmp/migrations-artifact/efbundle: __strdup: symbol not found
Error relocating ./tmp/migrations-artifact/efbundle: __isnan: symbol not found
Error relocating ./tmp/migrations-artifact/efbundle: __isnanf: symbol not found
To fix this, execute the following command using the before_script section:
apk add gcompatIssue #2
This exception might show up:
Microsoft.Data.SqlClient.SqlException (0x80131904):
A connection was successfully established with the server, but then an error occurred during the login process.
(provider: SSL Provider, error: 0 - The certificate chain was issued by an authority that is not trusted.)
A quick fix (but not a recommended one for production environments!) is to add TrustServerCertificate=true to the connection string:
DB_STRING=`echo ${DB_STRING} | sed "s/$/TrustServerCertificate=true;/"`Issue #3
Depending on your configuration the Bundle might not work due to an error similar to this one:
Cannot open server <serverName> requested by the login.
Client with IP address <ipAddress> is not allowed to access the server.
To enable access, use the Windows Azure Management Portal or run sp_set_firewall_rule on the master database to create a firewall rule for this IP address or address range.
It may take up to five minutes for this change to take effect.
Thankfully, Azure CLI can help with that. First, you need to get the public IP address of the machine where the job is being executed. This can be easily done using APIs such as https://checkip.amazonaws.com/ or https://api.ipify.org/. Then the az sql server firewall-rule create command can be used to add the IP to the Allowed Client IPs list:
IP=`curl -s https://api.ipify.org/`
az sql server firewall-rule create --resource-group ${AZURE_RG} --server ${AZURE_DB_SERVER} --name GitLab-Runner --start-ip-address ${IP} --end-ip-address ${IP}
Putting it together
This was a lot to take in. Here's the final job definition that should be immune to the most common issues:
deploy-backend:
  image: mcr.microsoft.com/azure-cli
  rules:
    - changes:
      - 'server/**/*'
  dependencies:
    - build-backend
  before_script:
    - 'pushd ./tmp/build-artifact'
    - 'zip -r ../../publish.zip .'
    - 'popd'
    - 'apk add gcompat'
    - 'az login --service-principal -u ${AZURE_SP_ID} -p ${AZURE_SP_SECRET} --tenant ${AZURE_TENANT}'
    - 'DB_STRING=`az sql db show-connection-string --client ado.net --server ${AZURE_DB_SERVER} --name ${AZURE_DB_NAME}`'
    - 'DB_STRING=`echo ${DB_STRING:1:-1}`'
    - 'DB_STRING=`echo ${DB_STRING} | sed "s/<username>/${AZURE_DB_USER}/"`'
    - 'DB_STRING=`echo ${DB_STRING} | sed "s/<password>/${AZURE_DB_PASSWORD}/"`'
    - 'DB_STRING=`echo ${DB_STRING} | sed "s/$/TrustServerCertificate=true;/"`'
    - 'IP=`curl -s https://api.ipify.org/`'
    - 'az sql server firewall-rule create --resource-group ${AZURE_RG} --server ${AZURE_DB_SERVER} --name GitLab-Runner --start-ip-address ${IP} --end-ip-address ${IP}'
  script:
    - 'az webapp deploy --clean true --resource-group ${AZURE_RG} --name ${AZURE_APPSERVICE} --src-path publish.zip --type zip'
    - './tmp/migrations-artifact/efbundle --connection "${DB_STRING}"'
It looks like all the pieces are in order. The next post will put everything together and modify the deployments a bit so that they work with different environments, namely staging and production. Till the next time!
Cover photo by Reto Simonet on Unsplash