

This is the third post in the GitLab CI/CD Series, where we'll be setting up a build & deploy pipeline using GitLab CI/CD. In the previous posts, we focused on creating deployable artifacts from Angular and .NET applications.
GitLab CI/CD Series Table of Contents
- Building Angular application
- Building .NET API Application and EF Core Migration Bundle
- Deploying Angular application to Azure Storage (you are here right now)
- Deploying .NET API to Azure App Service and Applying EF Core Migrations
If you've never worked with GitLab CI/CD before, the first post is a great thing to have a look through, as it covers most of the basics.
Recap & summary
If you're up-to-date with where the last article ended, feel free to skip this section.
Here are the assumptions about the project:
- The project is hosted on GitLab
- One repository contains both .NET and Angular applications
- The Docker GitLab Runner executor will be used
- The CI/CD pipeline will consist of the following stages:
build,staging, andproduction, with the last two being all about deployment to different environments - The project structure is:
And this the the current look of the gitlab-ci.yml file:
To sum up: the build jobs are created when there are any changes in the client/ or
server/ directories. The dependencies of each build are downloaded from the caching service
before each build is started and uploaded back to it once the build succeeds. The
build-frontend job produces an artifact with the Angular application. The
build-backend job's artifact contains the deployable .NET application and an EF Core Migrations
Bundle that is capable of applying database schema and data updates.
Hosting Static Web Application in Azure
There are a couple of ways to host the Angular application files. The simplest way is to serve the Angular application using the ASP.NET Core project it is designed to work with. That's very convenient but causes a very tight coupling between the two, which might not always be desirable.
The support for this approach is very comprehensive (for more details, visit Use the Angular project template with ASP.NET Core). The greatest upside is the simplicity of deployments, as both applications are deployed at the same time. This helps avoid some problems like incompatibility between different versions of the frontend and the backend.
The biggest strength might also be the approach's biggest weakness. Independent deployments might be a deal-breaker for many projects, so other hosting options should be explored.
One of such is uploading the static files to a file storage service (e.g. Azure Storage) and then pointing a CDN at them. That's a pretty popular strategy and is enough for most cases. What's great about Azure Storage is that the separate CDN service is not always needed. For simple cases, the service has a feature called Static website. After turning it on, it's just a case of uploading the built application to the container. It has some limitations that are described at Static website hosting in Azure Storage, but it might just be enough for your needs.
If hosting a static website on Azure Storage is not enough for your project, there is one more Azure offering available. Some time ago, Microsoft introduced Azure Static Web Apps. It is more powerful than the previous approach as it supports authentication provider integrations and can even have a backend based on Azure Functions. It is surprising how many well-thought-out features it supports. To read more about them, read this great blog post: Comparing Azure Static Web Apps and Azure CDN/Storage.
Setting up
For this project, hosting the Angular application on an Azure Storage account is definitely enough.
Setting up the Storage account is super simple. All that needs to be done is to turn on the Static website option:
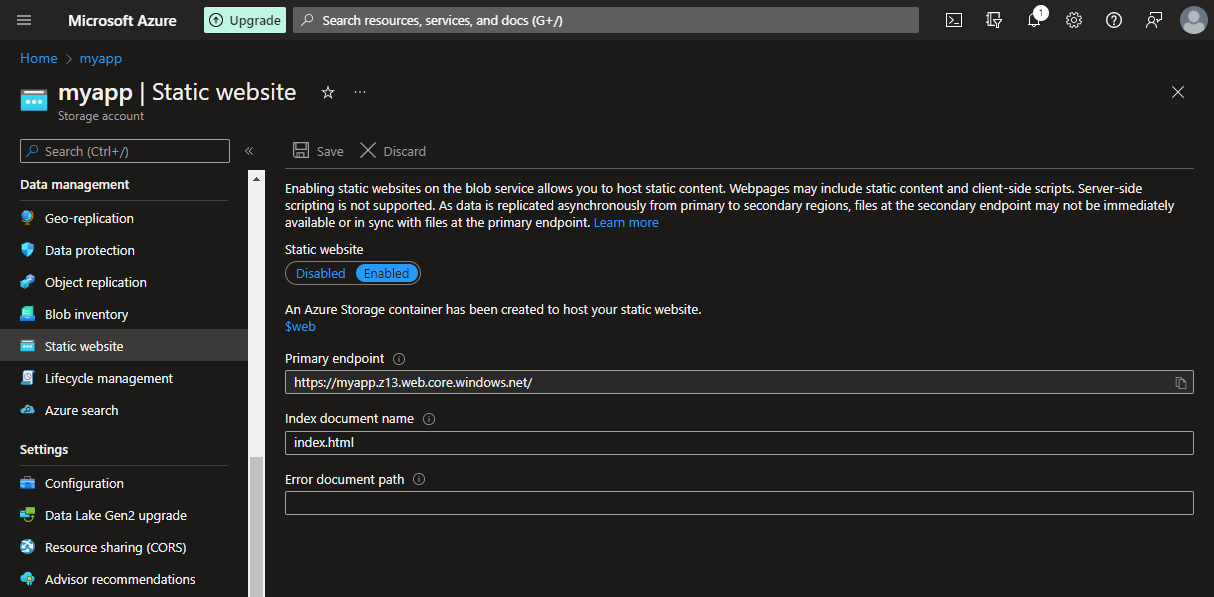
And that's all there is to it. After uploading the application files to the $web container, the application will be available at the given endpoint. Neat!
Deploying to Azure Storage using GitLab CI/CD
Uploading files to an Azure Storage container is very easy using the Azure CLI. There are two things that are needed:
- Azure Storage account
- Azure Account (or an Azure Service Principal) with access to that Storage account
Creating Azure Service Principal was described in this section of the first post of the series.
Thankfully, Microsoft provides a Docker image with the Azure CLI that's built on top of Alpine Linux, which makes it small but super powerful. Let's get to it then!
The first thing is adding a new stage to the gitlab-ci.yml file:
stages:
  - build
  - deploy
The deployment job definition should look familiar:
deploy-frontend:
  image: mcr.microsoft.com/azure-cli
  rules:
    - changes:
      - 'client/**/*'
  dependencies:
    - build-frontend
  before_script:
    - 'az login --service-principal -u ${AZURE_SP_ID} -p ${AZURE_SP_SECRET} --tenant ${AZURE_TENANT}'
    - 'STORAGE_KEY=`az storage account keys list --account-name ${AZURE_STORAGE_NAME} --output json --query "[0].value"`'
    - 'az storage container create --auth-mode key --account-key ${STORAGE_KEY} --account-name ${AZURE_STORAGE_NAME} --name ${AZURE_STORAGE_CONTAINER} --public-access blob'
  script:
    - 'az storage blob upload-batch --auth-mode key --account-key ${STORAGE_KEY} --account-name ${AZURE_STORAGE_NAME} --overwrite true --source ./client/myapp/dist/ --destination ${AZURE_STORAGE_CONTAINER}'
There is one new section here: dependencies. It tells the GitLab runner which jobs' artifacts should be downloaded before executing any scripts. Because the Angular application artifact was built in the build-frontend stage, that's what's specified here.
The specified commands do the following:
- Log in to Azure using Azure CLI
- Get an access key to the storage account whose name is stored in the
AZURE_STORAGE_NAMEvariable - Create a container with a name based on the
AZURE_STORAGE_CONTAINERvariable (if not exists) - Upload files from the build artifact to the container
It really is as simple as that. Now there are a couple of variables that need their values to be defined. The AZURE_STORAGE_CONTAINER will be added to the YAML configuration file:
 variables:
  RUNTIME_ID: 'win-x86'
  MIGRATIONS_RUNTIME_ID: 'alpine-x64'
  AZURE_STORAGE_CONTAINER: '$$web'
Because the application will be hosted as a static website on Azure Storage, the container name must be $web. Because the container's name contains the dollar sign, a second one must be added at the front to inform the GitLab runner to not try to treat it as a variable and expand it.
The other variables: AZURE_SP_ID, AZURE_SP_SECRET, AZURE_TENANT, and AZURE_STORAGE_NAME will be defined as project-specific variables in GitLab UI. That can be done in the Settings tab under CI/CD menu:
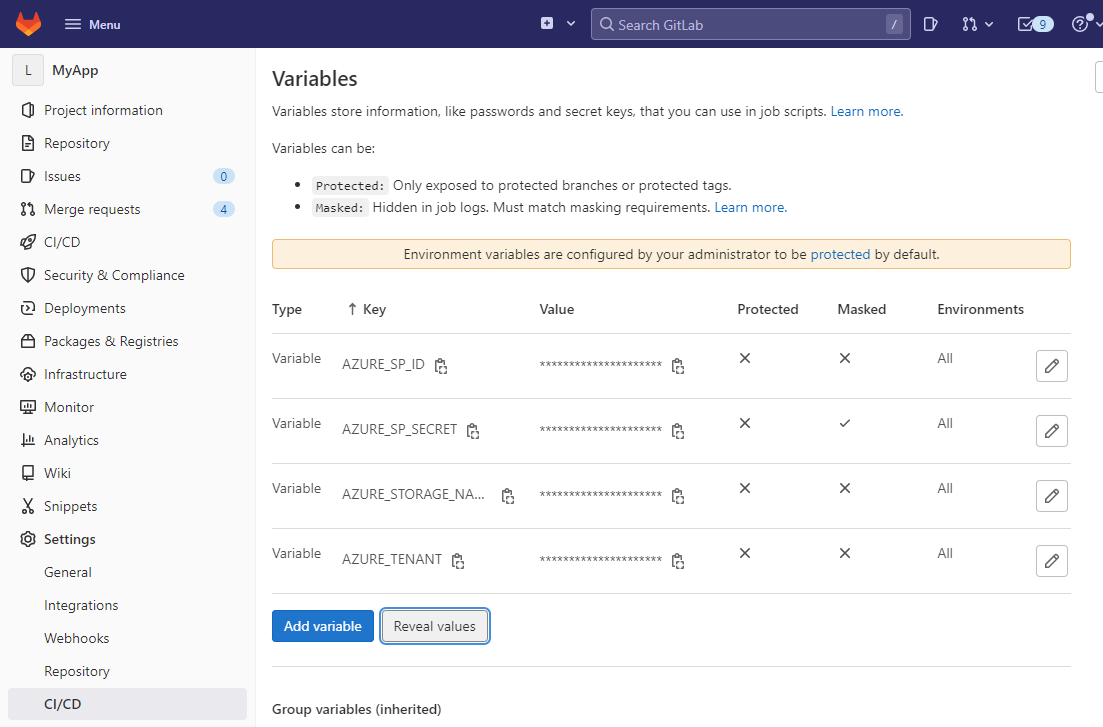
Note that the AZURE_SP_SECRET variable is set to be Masked. That means that it will not show up in the CI/CD logs.
You might ask why are some variables defined in the YAML file while others are located in the UI. As explained sometime earlier, the ones defined in the gitlab-ci.yml file will be treated more like constant values so that they can be consistently reused in different commands. The variables defined in the UI can have varying scopes depending on the environment which will be useful later.
And that's it - the Angular application will now be automatically deployed. The final gitlab-ci.yaml file should look like this:
stages:
  - build
  - deploy

variables:
  RUNTIME_ID: 'win-x86'
  MIGRATIONS_RUNTIME_ID: 'alpine-x64'
  AZURE_STORAGE_CONTAINER: '$$web'

build-frontend:
  stage: build
  image: node:16.9.0
  rules:
    - changes:
      - 'client/**/*'
  cache:
    key:
      prefix: 'frontend'
      files:
        - 'client/webapp/package-lock.json'
    paths:
      - 'client/webapp/node_modules'
  before_script:
    - 'cd client/webapp/'
    - 'npm ci'
  script:
    - 'npm run build'
  artifacts:
    name: 'frontend-${CI_COMMIT_SHORT_SHA}'
    paths:
      - 'client/webapp/dist'

build-backend:
    stage: build
    image: mcr.microsoft.com/dotnet/sdk:6.0
    rules:
      - changes:
        - 'server/**/*'
    cache:
      key: 'backend'
      paths:
        - '.nuget'
    before_script:
    - 'dotnet restore server/MyApp/src/Api/Api.csproj --packages .nuget/ --runtime ${RUNTIME_ID}'
    - 'dotnet tool install --global dotnet-ef --version 6.0.5'
    - 'mkdir -p ./tmp/build-artifact'
    - 'mkdir -p ./tmp/migrations-artifact'
    script:
    - 'dotnet publish server/MyApp/src/Api/Api.csproj -c Release --no-restore --runtime ${RUNTIME_ID} --no-self-contained -o ./tmp/build-artifact'
    - 'cd server/MyApp && dotnet ef migrations bundle --target-runtime ${MIGRATIONS_RUNTIME_ID} --self-contained -o ../../tmp/migrations-artifact/efbundle'
    artifacts:
      name: "backend-$CI_COMMIT_REF_NAME"
      paths:
        - 'tmp/build-artifact'
        - 'tmp/migrations-artifact'

deploy-frontend:
  image: mcr.microsoft.com/azure-cli
  rules:
    - changes:
      - 'client/**/*'
  dependencies:
    - build-frontend
  before_script:
    - 'az login --service-principal -u ${AZURE_SP_ID} -p ${AZURE_SP_SECRET} --tenant ${AZURE_TENANT}'
    - 'STORAGE_KEY=`az storage account keys list --account-name ${AZURE_STORAGE_NAME} --output json --query "[0].value"`'
    - 'az storage container create --auth-mode key --account-key ${STORAGE_KEY} --account-name ${AZURE_STORAGE_NAME} --name ${AZURE_STORAGE_CONTAINER} --public-access blob'
  script:
    - 'az storage blob upload-batch --auth-mode key --account-key ${STORAGE_KEY} --account-name ${AZURE_STORAGE_NAME} --overwrite true --source ./client/myapp/dist/ --destination ${AZURE_STORAGE_CONTAINER}'
Cover photo by Taylor Vick on Unsplash